CLICK HERE FOR FREE BLOGGER TEMPLATES, LINK BUTTONS AND MORE! »

Thursday, March 31, 2011

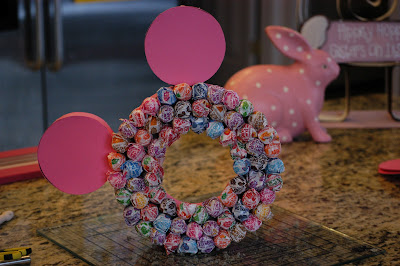
Sweet, Sweet Mickey!

A sweet friend of mine was so helpful with Jenna's party that I decided I needed to repay the favor. Her daughter is having a Mickey/Minnie Mouse themed party soon where she is having a candy table for the kids. So, here is one contribution...


Love it! Can't wait to use this idea for Ty's party in the summer with red cardstock instead.

My "Cast of Characters":

Styrofoam wreath
Styrofoam circles
Hot pink cardstock
Dowel rod
White acrylic paint
Glue gun
Glue Sticks
Dum Dum Lollipops
Scissors
Paint brush

Here is how I did it...
I cut two inch wide strips out of hot pink cardstock. I knew that I would have to overlap or cut some to fit the entire way around the wreath and the circle styrofoam.

Then, I used my glue gun to attach the cardstock strips to the styrofoam. I highly recommend using the white styrofoam for this project.  I discovered very quickly that the hot glue did not want to stick as well to the green styrofoam.

I covered both ears.

Then, I did the same thing to the styrofoam wreath (mickey's head).
Once covered, I inserted a short dowel rod into each ear. Then attached each ear to the wreath with the other end of the dowel. Notice how part of the ear is uncovered... this is where I inserted the dowel and attached it to the head.  The styrofoam did not show once attached.

At first, I was going to cover the ears (as shown).  Instead I decided to use lollipops on the ears, too.
I started off inserting the pops around the outside edge of the wreath, working all the way around. Then, I started another row.  In all, I made three rows.  Just watch your spacing as not to expose too much of the styrofoam.

At this point, I removed the pink cardstock over the top of the ears and began placing the lollipops on the ears, too.
Once both ears were done, I needed a way to display it.  At first, I was going to use a dowel (that I painted white) placed inside a hot pink tin and cover it with colored licorice.  What I found was that the finished piece was just too heavy.  The weight of it pushed the dowel all the way through.  So, Plan B was to shorten my dowel, insert it into the back of the wreath at an angle.  This worked well and allowed it to stand propped up.
So, again here is the finished product...


Too, too cute!


Tip Junkie handmade projects


Tuesday, March 22, 2011

Bad, Bad Blogger

Well, well, well...
She's back.
What can I say...
I have been a HORRIBLE blogger!
My last blog was, oh, let me see....
um, well, let's just move on, shall we?
Let's just say its been a crazy couple of weeks - not to mention I think I got food poisoning!  Uugh!
So to all my followers...
I am sorry for not checking in and keeping up.

I truly do not know how people do it.  How do they do all these amazing things, take pictures, and then find time to blog about it daily all the while going about all their "normal" daily routines.  Again, its the time management thing, I guess.  Maybe I will take a lesson from my SIL and set an alarm each night before bed to blog. Great Idea!  For now, I think I am doing the best I can.

So, here is what I have been up to...

Yep, that's right, more cake balls!
120, to be exact
All for St. Patty's Day
This was the first set in the making. I decided if I took three cake balls, formed them into hearts and used melted chocolate in between, then they would form a shamrock!  I took it a step more and purchased a shamrock candy mold.  I poured a lighter green candy into the molds and attached them to the front of each shamrock. Aren't they cute? Even cuter when they are wrapped!

Because these took soooooo much longer to assemble and I had soooo many to complete, I decided to finish the rest in plain cake ball style.

And more...

And more...

And more...


Once I finished these I went to work on cleaning out my bedroom.  What a mess!
It's finally done, but I DID NOT want to post pics of the before of that one! WoW!

Finally, I am so EXCITED! A dear friend asked me to make a cake for her! She wanted a tombstone for an over the hill themed bday party.  Once she posts pics from the bday party I will share.  I am kicking myself that I did not get pics of that amazing cake. I had a blast doing the cake and hope I get asked to do many more.  I am still learning and defintely a "newbie", but I had a blast doing it!


Tip Junkie handmade projects


Friday, March 4, 2011

One Room A Day Challenge: Days 6 & 7

This is our "Belle"


Now I know where this nickname comes from...

I adore Beauty and the Beast... so, its stands to reason that I would consider my little princess, "Belle", but it also means "beautiful".

 And beautiful she is! As the mom, I know I am certainly biased, but let me tell you that she is truly one of a kind!  Quite possibly the sweetest spirit I have ever known.  To me, she just radiates beauty in so many ways.  On the outside, golden wavy locks and bold baby blue eyes... Gorgeous! On the inside, even more...
Compassionate, Unselfish, Peaceful, Joyful, Loving, Thoughtful, Gentle...
Just to name a few! Now don't get me wrong, she has her moments where those characteristics don't exactly shine through, but God blessed us with a truly beautiful baby girl! I can't wait to see what He has planned for her.

With that said, here is one of her weak spots.....

Her Room Before:
Yep, this is what I pulled out of her closet!

And this would be just a glimpse of her filthy bathroom sink.

And the messy bathroom drawers.
and her unmade bed and Barbie house.
We caught her on a good day because she did clean up her floor.
And this would be her "computer storage area"
Now, I must confess the bulletin board is my fault.  I decided to hang it in a different spot and had not done it yet.
and her idea of putting her books "away"
And the corner of her room
(Anyone need a spoon? Why is that there?
Like the new and stylish TV? You know you want one too!
How about those wires! Let's just let it all hang out!)

I am just struggling with the kids' rooms in general.  Bean's was pretty easy, but the last three I have left to complete just seem off.  My decorating is just "not right".  So I took a picture of this particular area before and have plans for this spot, but am still working on it.  For now, I am just organizing and cleaning, not redecorating.

And After:
(Remember, I am not redecorating! So just focus on the organizing and cleaning here.)

A beautifully made bed

An organized bookshelf
(yes, I did go through the bins, too!)
A Clean Closet Floor
A fully organized closet
And remember that filthy bathroom...
Sparkling clean

And the drawers
Even the stuffed animals have their own space now!

Well, it looks like I just have some decorating to do! Overall, her room was really not that bad in comparison to Bean's room.  The worst is yet to come though...

How about you? What have you been organizing?
What was your challenging room of the day?

Tuesday, March 1, 2011

One Room A Day Challenge: Day 3,4,5...

"Bean's" Room
Let me preface this by saying that we affectionately call her our "Bean" because we have just always called her Jenna Bean! Don't ask where it came from... I don't know. Just a little nickname for our girl.

So, the messy monster officially struck her room.
Welcome to a home were the mom was sick for weeks, the working dad is playing Mr. Mom and the kids, well, are acting like kids!

Gross! 
This is just a mess. I seriously could not walk in there without clearing a path.

Her Armoire

Her closet (bottom)

Closet (top)
This is actually not too bad...

After:

Her closet wasn't too bad, really.  Its amazing how after sorting through her full closet, this is what actually fits her.


And the floor is completely clean!
 This room honestly took forever.  Between just picking up, organizing and cleaning it took a couple of days. She and I are working on keeping it clean each day and NEVER letting it get that out of hand again. Wow!

So, what are you working on?